Guida per trapano per recinzione per piscina salvavita e livella a bolla per recinzione per piscina fai da te

Brand:Life Saver Pool Fence

3.2/5

189.47

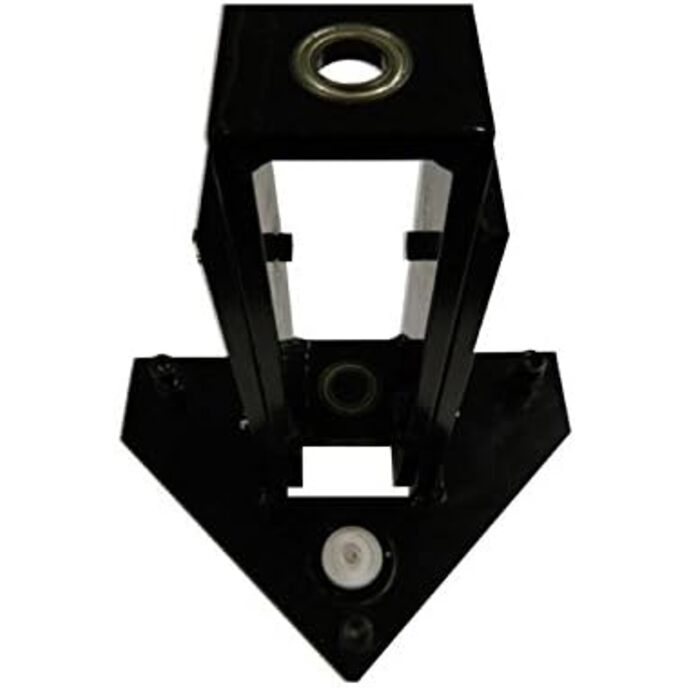
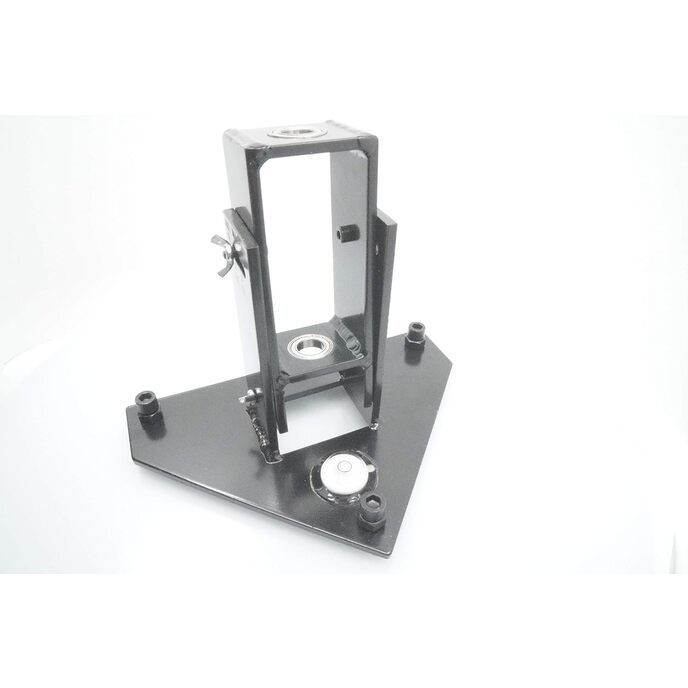
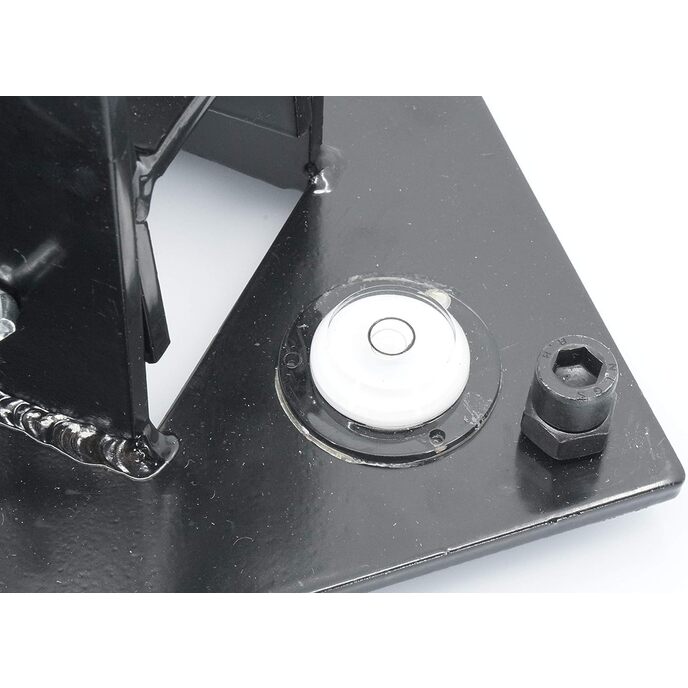
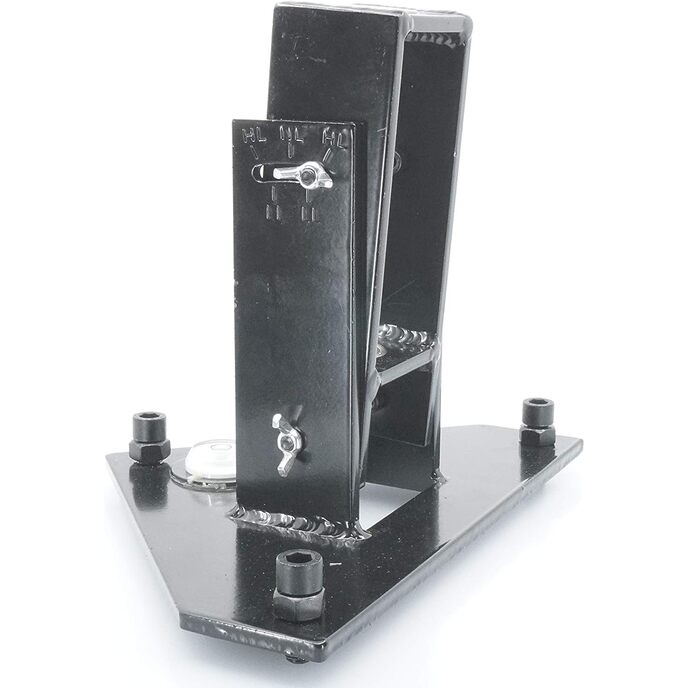
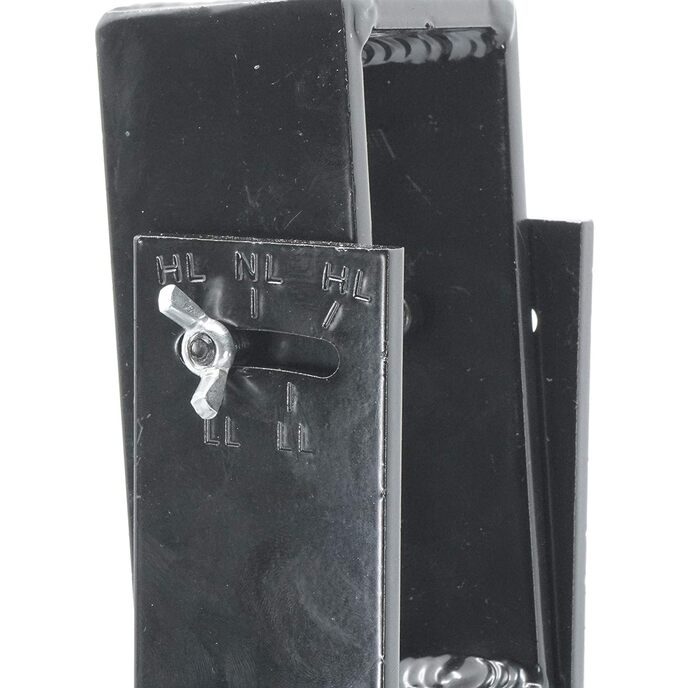
La guida per trapano fai da te per recinzione per piscina di Life Saver rende facile praticare in modo accurato e coerente i fori richiesti durante l'installazione di pannelli e cancelli di recinzione dal sistema di sicurezza per piscina fai-da-te. La guida per trapano elimina le congetture dal processo di perforazione per una corretta installazione nel terreno e presenta una livella a bolla allegata. L'installazione richiede un martello perforatore da 1/2 pollice (minimo) con una punta da trapano per calcestruzzo da 5/8 x 14 pollici (o più lunga). Un'azienda a conduzione familiare con sede a Delray Beach, FL, Life Saver mantiene i piedini su un terreno solido da oltre 25 anni. Oltre a Pool Fence DIY, Life Saver offre un'opzione Pool Fence installata dall'appaltatore.

L'installazione richiede un trapano a percussione con una punta per muratura standard da 5/8 pollici x 14 pollici (minimo) (non inclusa). Elimina le congetture dal processo di perforazione; include livella a bolla allegata. Semplifica la perforazione precisa e uniforme dei fori richiesti nel calcestruzzo. Da utilizzare con il sistema di sicurezza per piscina fai da te Pool Fence.
Brand Life Saver Pool Fence
Country of Origin China
Customer Reviews 4.1 4.1 out of 5 stars 336 ratings 4.1 out of 5 stars
Is Discontinued By Manufacturer No
Item Dimensions LxWxH 10 x 10 x 12 inches
Item model number DIY Drill Guide
Item Weight 3 Pounds
Manufacturer Life Saver Pool Fence
Material Concrete
Product Dimensions 10 x 10 x 12 inches
Style Drill Guide

3.2

9 Review
5 Star
67
4 Star
9
3 Star
7
2 Star
4
1 Star
14

Scrivi la tua recensione

La tua mail non sarà pubblicata. Tutti i campi obbligatori sono segnati con*

Scritto da: A BH
Perfect drill guide
Would really well and made sure the holes I was drilling into concrete were straight. Made job much easier
Scritto da: Mike
Essential to set up the pool fence properly
This is very easy to install, and the fence is good and sturdy. I bought 10 sections of fence (as well as the gate) and from first getting the product out the box to having the gate leveled and adjusted took about 8 hours. That included the time to actually read the instructions and plan out the fence route. The drilling base is essential, and also sturdy. The bullseye system and leveling bolts work fine, there are two bushings in it so the drill bit rotates freely, and you need to put some angle on the fence posts, depending on the shape of your pool. If you have a square pool, then you could get by without the base, but if you have some curved shape to your pool, then you set the posts at a slight tilt in order to get the right tension on the posts. I would not want to try doing that drilling without the guide. You need an 18" bit in order to get deep enough into the pool deck with the drilling guide. The gate was probably the most complicated bit of the installation, but still easy enough to do. Even with buying a Bosch rotary drill specifically for this job, 18" long 5/8" drill bit and the guide base I paid about a quarter of what I got quoted for this job.
Scritto da: RamblinMan
Easy to use and worked perfectly for my 50+ holes
Easy to use and worked perfectly for my 50+ holes, without a hiccup. I've seen a few complaints that the bearing holes are significantly larger than the 5/8" drill bit. But, from my perspective, I'd rather have some clearance to avoid the risk of the bit binding up in the jig. A 10-amp rotary hammer drill suddenly grabbing the guide could cause some injury. Plus, the drilling angle isn't THAT critical. The instructions for my fence talk about "light lean" or "heavy lean" for the poles. So, we're not looking for anything too exact here. I tried to keep the drill centered in the guide by concentrating on the upper bearing and focusing on keeping the upper bearing from spinning, which indicates that the bit isn't contacting the bearing. In sum, the guide simply lets you set up to drill a hole much more quickly, with confidence that your are within the acceptable range. If you're like me, when you start getting bored/tired/hot, you're more likely to make a mistake. Without this guide, I'm sure I'd have more than a few poles that are way off. This guide goes a long way to preventing mistakes relating to the angle of the holes.
Scritto da: Frequent Amazon Customer
Necessary. Don't cheap out and not buy it.
This is necessary if you are installing thePool Fence DIY by Life Saver Fencing Section Kit, 4 x 12-Feet, Black yourself. We had over 30 holes to drill and I would never have attempted to get them correct without this. Be aware that when installing the Pool Fence you'll need to Lean (Light Lean or Heavy Lean) at certain points around the pool to ensure your fencing doesn't look amateur and wonky. Any turns in the fence will ensure a lean of some sort. This guide is essential in getting the lean correct. I took a star off because after 30 holes it was looking pretty rough. For as much as we paid, it should probably hold up better. But we did beat the crap out of it so I suppose it did its job.
Scritto da: George Crawford
Worth the hefty price if you want straight holes drilled for fencing
I purchased the DIY-DG Drill Guide and a couple Bosch HC2107 S4L SDS-Plus Shank Bit 5/8 by 16" drill bits to install my new Life Saver Pool Fence sections and Gate. This guide was easy to use and does have a bullseye level on it. I didn't know it already had one. I purchased a level almost identical to the one that is on it, hoping to accomplish the same thing. Now I have an extra level in my tool arsenal which is never a bad thing. The guide is easy to adjust for light lean and heavy lean which is required for the fence install. The bearings in the lower section did pop out after roughly 25 holes drilled, but I could easily smacked it back into place with a hammer and didn't have any issues since then. Although it may seem a little pricey, I highly recommend this product if you want quick, accurate holes drilled.
Scritto da: SJRoberts
works as advertised...
works great but a bit expensive... now that my fence is up, it'll make a great door stop! lol
Scritto da: Nicole B
MUST HAVE
I don't know how we would've done without this to install the pool fence. We were on the fence about it because of the reviews but we got it anyways and it was an incredible life saver. To try and hold the drill steady and in the right lean/level direction would've been nearly impossible without this unless you're in masonry by trade.
Scritto da: AMM
Expensive and Unnecessary
Not worth the investment. The baseplate is too small to hold the guide securely in place. Drilling into concrete causes significant vibration, and this guide was bouncing all over despite my standing on the baseplate. The vibration also caused the bolts on the angle adjustment to slip while drilling only the second hole. The bit caught and bent, tearing the drill out of my hand, and cracking it into my knee. Despite a likely sprained wrist and seriously bruised knee, I finished the rest without the quide. Whatever precision I might have lost without the guide was made up for by being able to hold the drill securely and not awkwardly trying to do two things at once. I should also note that the theoretical level of precision offered by this guide is pointless if you have a curving pool. You have to adjust the angle of the hole based on the curve of the pool, and the angles needed are guesses at best. Going around curves the fence poles all pull on one another oddly, such that accuracy of drilling doesn't seem to have much of a direct relationship to the resulting fence appearance. I have several holes in a row drilled perfectly as intended, but the poles stand a odd angles from the tension going around curves. I have other holes drilled poorly, but the poles stand upright thanks to the rest of the fence pulling them into place. So my advice is to save your money and go freehand. If you really want to use the guide, work out a way to attach it to a larger baseplate, so you can hold it in place without turning yourself into a pretzel. Also note you need a 16-18" bit for this, despite Amazon suggesting a 12" bit.
Scritto da: Ashton
Must have
As per my husband this is a must have to install properly. He didn't want to spend the money but was happy he did

Prodotti correlati

hot
Sostituzione del meccanismo Zodiac G53
3.2/5

€ 100.32

Sostituzione del meccanismo Zodiac G53
3.2/5

€ 100.32

hot
Tecmark PT1-3130-02 PT13130-02, marrone
3.4/5

€ 64.70

Tecmark PT1-3130-02 PT13130-02, marrone
3.4/5

€ 64.70

Scopri il nostro network internazionale

Spediamo in 28 paesi, oltre 200.000 prodotti. Resta aggiornato, iscriviti alla newsletter.

Shopping Cart