CoverMate 7930 Spa Corrimano laterale con base

Brand:Cover Valet

3.5/5

260.08

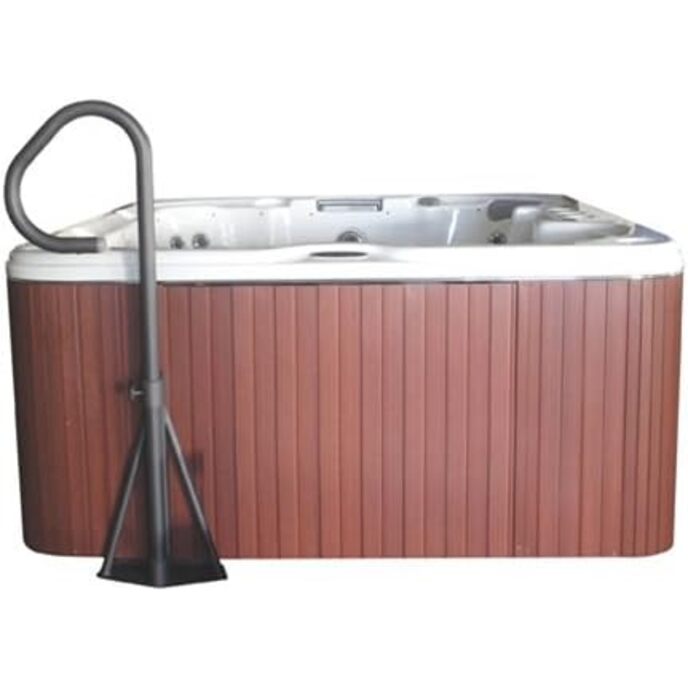
Il corrimano laterale della spa ruota di 360° per consentire l'ingresso o l'uscita assistita dalla spa. La funzione di blocco consente di fissare il corrimano in qualsiasi posizione per una maggiore sicurezza e tranquillità. L'esclusiva base sotto la spa elimina il fissaggio all'armadietto della spa. Utilizza il peso della spa per la massima stabilità. Adatto a spa fino a 40 di altezza.

Prodotto non disponibile
Adatto a spa fino a 40 di altezza. L'esclusiva base sotto la spa elimina il fissaggio all'armadietto della spa. La funzione di blocco consente di fissare il corrimano in qualsiasi posizione per una maggiore sicurezza e tranquillità. Il corrimano ruota di 360° per consentire l'ingresso o l'uscita assistita dalla spa.
Customer Reviews 4.6 4.6 out of 5 stars 412 ratings 4.6 out of 5 stars
Is Discontinued By Manufacturer No
Item model number 7930
Item Weight 22.4 pounds
Manufacturer Electrical Distributing Inc
Product Dimensions 37 x 18 x 4 inches

3.5

8 Review
5 Star
74
4 Star
15
3 Star
5
2 Star
3
1 Star
3

Scrivi la tua recensione

La tua mail non sarà pubblicata. Tutti i campi obbligatori sono segnati con*

Scritto da: E. Stocks
Best of a limited range of options. Tub must be drained to install.
It's good looking. It has a blue LED in the end of the handle that needs batteries. There's a tiny amount of wobble as you lean into it, but then it's not on perfect footings on my pea-shell base. No concern with putting my weight onto it. You'll need a drained tub to install. I found it was touching my cover lifter so I needed to wedge in some foam.
Scritto da: Christine
Worked perfectly
Easy to put together even though the directions weren't exactly right. Love the light on the end it is nice and it is very sturdy.
Scritto da: Chuck
Safety!
I feel it will work, I would like it even more beefed up at the base and, Feel recess needs to be at the point that you screw the set knob in. I will drill a hole to accomplish that.
Scritto da: Paul VW
Missing screws, washers & nuts
Solid and sturdy. Good looking. Nice Quality. Included directions are useless, so you'll need to figure it for yourself based on the finished product picture. Some pieces not even mentioned in the directions. Missing several screws, washers and nuts - requiring harware store purchase. For the price, expected better directions and all parts included.
Scritto da: AT
Safety
Needed a solution to improve safety getting in & out of spa. This product does that & will allow more years of using the spa.
Scritto da: Kelly B.
EASY!!! stable, strong, sturdy, perfect for us hot-tubbers!
We are so happy we put this Hand rail at our hot tub. It not only holds the towel for us while we soak, but it helps us to be safe while getting in and out! It feels so Strudy and safe. I have always been afraid of falling as I enter and exit the hot tub, which is freestanding. This Hand rail takes away all my fears as the bar is big enough to really hang onto on the outside, but also on the inside since it rises a few feet above hot tub, until I've reached my sure-footedness on the first seat. Hope Im making sense... The hand rail takes all my fear away as I can hang on until I feel safe and sure footed! It has prevented me from slipping many times, where I begin to slip but simply grip handrail and steady myself. Thanks for this! Also, simple to install BUT DO IT WHILE EMPTY as it goes under the tub for stabilization.
Scritto da: JP
Very Stable Handle (and How to Assemble the Light)
Very impressed with this item. Assembled easily and slid right under the spa after draining for cleaning. Has a little “give” to it, but the rotating feature is great. Very stable. The instructions do not include how to install the light. Here’s what worked well for me: 1 - Install the batteries (to make sure the light works) 2 - Disconnect the battery pack from the light (there’s a small junction between the two, squeeze the retaining clips together and pull the sections apart) 3 - Remove the rubber cover from the top of the switch 4 - Feed the switch through to its hole from the inside of the tube and press it into the hole until it snaps into place 5 - Replace the rubber cover on the outside of the switch – you may need to work it back into the gap a bit 6 - Reconnect the wires 7 - Insert the battery pack into the tube, sliding it alongside the switch (to allow clearance for the light) 8 - Insert the light unit into the tube, aligning the small button to the corresponding small hole in the tube, just behind the switch
Scritto da: Amazon Customer
Almost a perfect 5
As I open the box all the screws were all over the box, It came up short (1) nut for base, (1) lock washer for base. Had to go to Home Depot. Even though there were no instructions for light switch on handle pretty easy to figure out. If all the the required nuts and washer were the I would have given the overall a (5)

Prodotti correlati

Scopri il nostro network internazionale

Spediamo in 28 paesi, oltre 200.000 prodotti. Resta aggiornato, iscriviti alla newsletter.

Shopping Cart