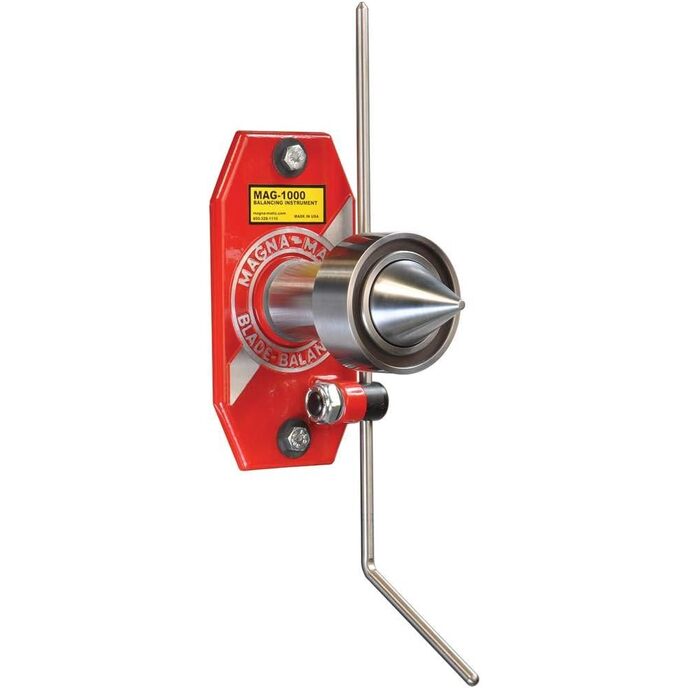
This year, I decided to try to sharpen and balance my own lawnmower blades. I did some research and decided to go all out, making this my most expensive blade sharpening and balancing experience ever. Before you balance the blade, you want to start with a clean blade and a sharpened blade. I started with a John Deere lawnmower blade for the JS36 that went through 1 season of cutting (but my brother in law borrows it so it's used twice the normal amount). I used C clamps to hold the blade to the workbench with extra 2x6" scrap blocks to prevent wire brush damage to the workbench. There was a thin film of caked on grass dust that I removed using a Norton wire cup and wire wheel brushes for the drill. The wire cup brush was used to remove the grass dust layer on the flat parts of the blade, and the wire wheel brush to get in and clean out the grooves in the blade. Please wear eye protection (I prefer goggles) as little wires can detach from the wire brush and fly in any direction. Even safer is wearing a face shield and hearing protection. Next I started with a handheld bastard file held roughly at a 30 degree angle and going from the back to front of the blade edge I made passes to help remove any convex or concave parts of the blade edge (for other blade types, the angle may be different). Then I flipped the blade over and on the back side made passes with the file parallel to the back of the blade. This helps remove chips that can happen from wood or rocks. It's not perfect since often times the blade isn't straight so the hand file doesn't follow the contour perfectly, but just do the best you can. The blade edge does not have to be sharp enough to cut your finger after filing, but still it's best to wear protective gloves when handling the blade. After spending about 20 minutes with the hand file, I used a Dewalt 4 1/2" angle grinder with a Norton 60 grit flap disc and made a make shift bench out of 2x6" to clamp the blade down near the garage slab floor. I inspected then installed the flap disc and spun it for about 30 seconds to make sure the disc integrity was good. I also made sure nothing flammable was nearby since sparks are created during this step. I also highly recommend a face shield and hearing protection for extra safety in the rare event the flap disc breaks apart. I then made several passes on both sides of the blade edge until I could see the metal luster along most of the cutting length of the blade. I started from the outside end of the blade and held the angle grinder at a roughly 15 degree angle and used the outside edge of the flap disc to follow the blade edge to the center of the blade. I repeated this process on the both sides and the back end of the blade. Once you finish this step, you're ready for balancing the blade. Typically the MAG-1000 is attached to a vertical wall but my garage's wall space is already pretty full. I decided to use a 2x4" to mount the MAG-1000, and then clamp the 2x4" to my workbench using angle aluminum. To mount the MAG-1000 to the 2x4" I used stainless steel 2 1/2" long x 5/16" diameter bolt with washers and hex nut on the back side. You can hold the MAG-1000 to the 2x4" and place it at a reasonable working height and drill out the holes in the wood and mount it. The directions say to maintain a 5 degree tolerance from vertical, so to help ensure this, I used my Johnson 4' level along the back of the 2x4" to make sure that the 2x4" was vertically level. To attach the blade to the MAG-1000, there is a metal cone that extrudes from the magnet. You put the back of my blade with the center hole onto the cone and pull the magnet attached to the bearing towards the blade until the magnet contacts and holds to the back surface. To remove the blade, I held the top of both sides of the blade and rotated the top away from the magnet and it comes off fairly easily this way, kind of like peeling the top of a banana towards you. To put the blade back on, I slid the magnet back first so that I'd get the cone all the way through the blade hole. Otherwise you may not have the blade centered if the magnet grabs the blade and the cone isn't perfectly in the middle of the blade hole. After the magnet holds the blade in place, you can spin the bearing with the blade attached and the weight imbalance will rotate the heavy end of the blade towards the bottom. The speed of rotation tells you how much imbalance there is. I measured the time it took for the blade to rotate from horizontal to vertical it was about 4 seconds (I just used a stopwatch on my phone). The instructions said that 1-3 seconds is imbalanced and 4-8 seconds is slightly imbalanced. I wanted to try to get it perfect. However, you don't really know how much to remove so that's part of the learning process. I discovered that the hand file is not capable of removing enough material to balance the blade in a time reasonable fashion. Instead, I resorted to making 20 passes of the flap disc on the heavy side of the blade. I used masking tape to mark which side is heavier when grinding the blade and then taking the tape off when trying to balance it (it's easy to get disoriented which side of the blade to sharpen). When I did this, each set of 20 passes increased the horizontal to vertical rotation time about 1/2 second. Repeating this process, I counted the number of grinding passes from end to center and stopped to measure the time the blade takes to rotate from horizontal to vertical. Once I got to 8 seconds, I started using passes of 10 with the flap disc as you're very close and after that low and behold the blade stayed horizontal. It was a good feeling to finally get it perfect. Unfortunately, it's hard to say whether this extra precision is worth it as far as cost. It's very difficult to discern changes in vibration without a measuring device, but I did notice less hand and wrist fatigue/numbness after push mowing for my typical 75-ish minutes. If you have expensive gear, you may show bigger maintenance savings over time by less vibration applied to your bearings and linkages, but for the casual homeowner doing weekly mows, you can certainly make do without. Still, I enjoyed the experience and having the capability to do your own blade maintenance can create less waste (some people throw out blades every 1 or 2 seasons). Overall, I was very satisfied with the quality of this blade balancer and it is made in USA and very well manufactured. Unfortunately for the casual homeowner, it's very difficult to discern whether the performance of this vs the simple nail in the wall pays dividends unless you do lawn care or maintenance as a career. I did take quite a bit of time learning, but the next time should be pretty fast. The John Deere blade did not require any adapters, but certain blades do so keep that in mind. Here's a list of my materials. One MAG-1000 One 2x4" by 8' Two Hillman stainless steel 5/16" diameter x 2 1/2" long bolt plus hex nut Four 5/16" washers Dewalt corded hand drill Dewalt angle grinder DWE43113 Norton Redheat 60 grit flap disc Norton Coarse Wire Brush Wheel Assorted 6 Pack for the Electric Drill One four foot section of angle aluminum 1/8" thick One 4' Johnson level Flat bastard file 2 C-clamps