Coleman Beach Sun Shelter Verde

Brand:‎Coleman

3.5/5

260.73

Configurazione semplice in circa 5 minuti; pali di terra e tiranti premontati inclusi. Misura 7 piedi e 6 pollici per 4 piedi e 5 pollici con un'altezza centrale di 4 piedi e 9 pollici. Tasche portaoggetti integrate e una linea asciutta per appendere gli indumenti bagnati. Cerniere sul pavimento anteriori estese per la privacy; la finestra posteriore si apre per la ventilazione. Tenda da spiaggia pop-up portatile con protezione solare 50+ UPF.

Configurazione semplice in circa 5 minuti; pali di terra e tiranti premontati inclusi. Misura 7 piedi e 6 pollici per 4 piedi e 5 pollici con un'altezza centrale di 4 piedi e 9 pollici. Tasche portaoggetti integrate e una linea asciutta per appendere gli indumenti bagnati. Cerniere sul pavimento anteriori estese per la privacy; la finestra posteriore si apre per la ventilazione. Tenda da spiaggia pop-up portatile con protezione solare 50+ UPF.
Brand Name ‎Coleman
color Green
Color ‎Green
Customer Reviews 4.4 4.4 out of 5 stars 5,118 ratings 4.4 out of 5 stars
Included Components ‎Extra-Long Stakes, Carry Bag, User Manual, Handy Dry Line, Floor Mat, Sandbags, Coleman Road Trip Beach Shade
Item Dimensions LxWxH ‎14.7 x 6.6 x 6.6 inches
Item Package Dimensions L x W x H ‎23.5 x 5 x 4.72 inches
Item Weight ‎6.17 Pounds
Manufacturer ‎Coleman
Material ‎fiberglass
Model Name ‎Coleman Compact Shade Shelter
Number of Items ‎1
Package Weight ‎2.88 Kilograms
Part Number ‎2000001955
Size ‎One Size
Sport Type ‎Camping & Hiking
Style ‎Lime/Gray
Suggested Users ‎unisex-adult
Warranty Description ‎Products sold by Designed For Outdoors are guaranteed to be free of defects in workmanship and materials for up to one year after the purchase date. Prolonged exposure to weather conditions including snow, rain and humidity are not covered under the warra

3.5

7 Review
5 Star
70
4 Star
15
3 Star
7
2 Star
3
1 Star
5

Scrivi la tua recensione

La tua mail non sarà pubblicata. Tutti i campi obbligatori sono segnati con*

Scritto da: Just another ama zon person
The Big, Beautiful Sun Blocking Machine!
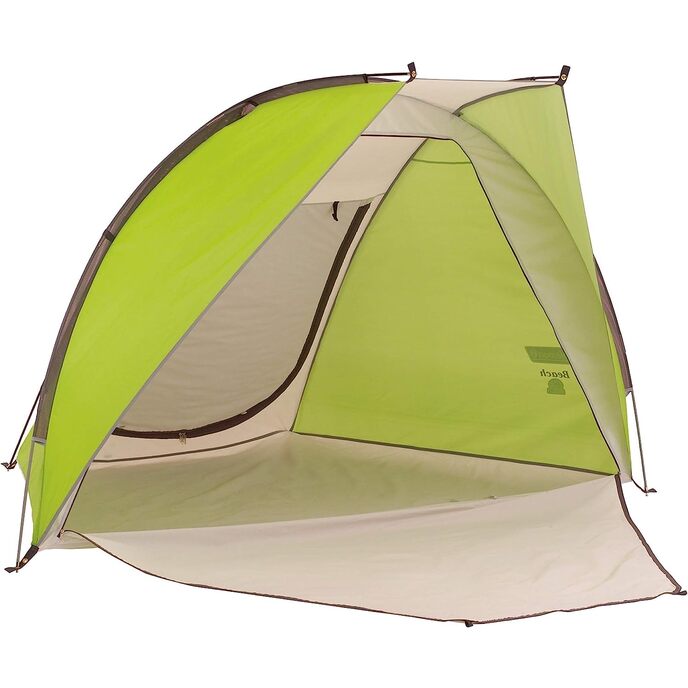
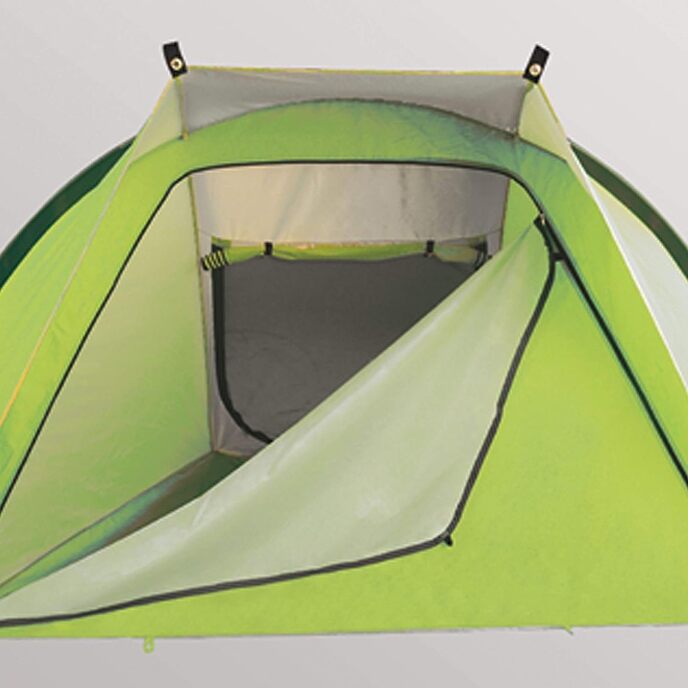
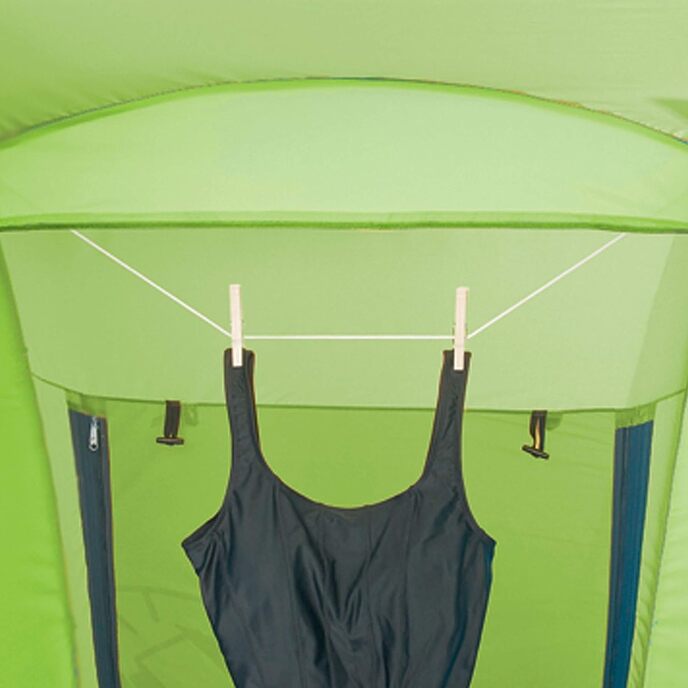
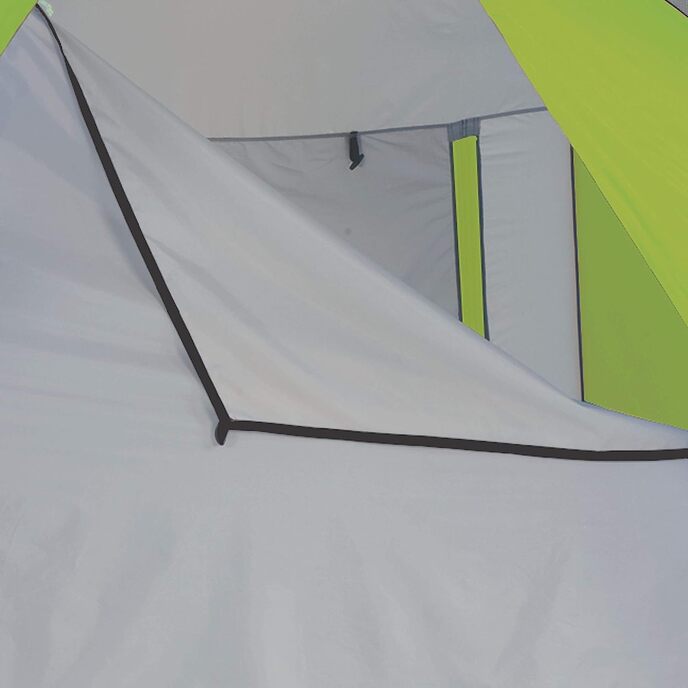
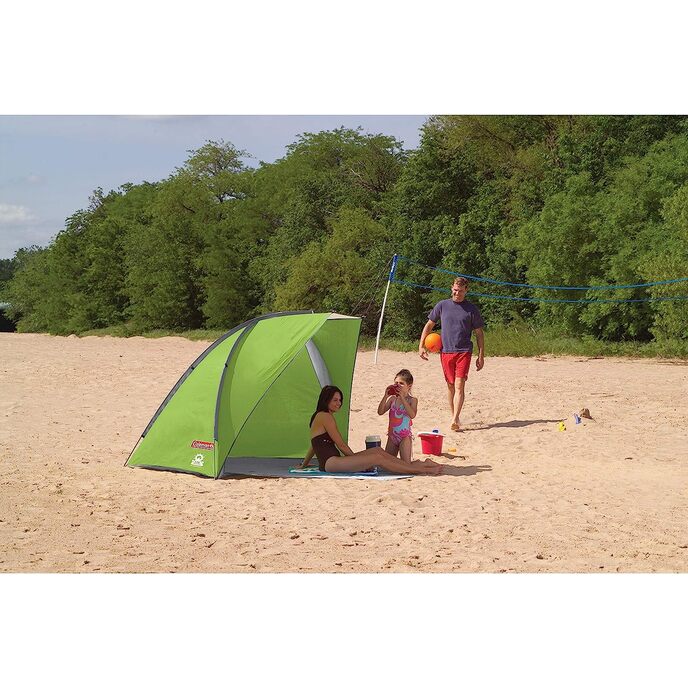
Aaaah! Luxury in the sun! We got the green one. We already had the blue one we bought over a year ago. it still works just fine. These Coleman beach tents are incredible. Everyone sees the top review of how someone had no clue how to use it or set it up the right way, which is pretty easy, and, instead, blamed all the mishaps on this well made Coleman beach tent. No matter how hot it is outside, it is always cooler inside this Coleman beach sun tent. You don't have to guess if it really does have SPF protection, you can see the inside and recognize it. Many people took the time to understand very simple mechanics of how to put up a modern day tent. A simple tent. It takes about 10 minutes to put it up. Time goes by fast. Practice setting it up and packing it away, in your home, ahead of time. Watch a few videos about how to put up a tent. Plus, people should know if there is any problem before the return window closes and before you actually take it out to use it. If you know how to set this up, one person can, easily. Everyone, even our young teens, know how to put these up properly, by themselves. These have a place near the "front porch" area to hang wet towels or bathing suits, or really anything that isn't too heavy. You could even hang fairy lights from that area if you were using this for whatever reason when the sun went down. You can hang solar panels off of the top or top sides with some D rings or maybe some paracord. You can throw your big beach towel over the top and it dries pretty quickly. It has a nice "patio" to keep more sand from kicking inside of it and to lay on. On the inside, in each corner at the bottom, are cargo net type of pockets to put things in, if you wanted to. You could put sun tan lotion in them, toys, bottled water, etc. Many already know this, but some don't, which is understandable, but you don't use small metal stakes in the sand for any serious purpose. You use those in the dirt....ground dirt not beach sand. You don't need all of the many smaller sand bag holders that come with this. You just need two regular sized plastic grocery bags, double bagged (4 total), that you fill with sand and put on each side of the tent to attach to the lines on the left and right outside --and then bury them down in the sand. When done, take your grocery bags with you. It's just that simple. This awesome luxury beach tent does come with smaller bags to use for sand bags. I think there are 6 of them. We don't need to use the included metal dirt ground stakes on beach sand to hold down that extended ground cover. You could set your flip flops and beach towels on the extended ground cover to hold it down if a breeze blows through---even a bottle of sun screen holds it down. If it's so windy everything is blowing all over the place, pretty wild wind going on, we likely would not be set up on the beach. You can also rain proof this. In tropical heat a rain shower during the day is not uncommon. You can change clothes or breast feed in these because of the privacy options. You can probably solo camp in them. I know these are stable and good enough for camping. This is our second one. Sometimes a friend or relative likes to borrow our other one. Sometimes one of the teens like to take it out when off with their friends. You can rain proof it and seam seal it. We did our blue one. We will this green one, too. For those who understand the easy task of pitching a tent, you'll love this. You'll find how easy and fast it is to put up and take down. For those who practice putting it away and learning the simple process of how to roll a tent up to go back in its carry bag, good on you for being motivated. Not everyone has someone to show them how to do everything so they take the time to learn these things by watching videos or asking someone. Ours came with very clear instructions sewn into it, with pictures. That would also be helpful to someone. You can use these in the park or at lakes. If at a park, regular ground dirt, and not a beach area, those metal ground stakes that come with this will be useful. If you want to take a dip in the lake or beach for a few, and zip the front shut, you can also take a twisty bread tie, larger paper clip, or a really small D ring and from the inside you can connect the "back door" zippers of this beach tent so they can't be unzipped from the back side ---where you can't see what's going on. Anyone casually strolling along looking to adopt another person's things want to appear natural to others, especially in a populated location tourists often visit. They won't usually start cutting a whole in the back of a tent. That tends to draw negative attention. To pack this up properly into the carry bag, what we do is: If someone else is with you, after you break down the tent, someone else can fold up the tent poles or you can do that yourself. We put the smaller stake bag inside the tent pole bag after the tent poles go back into their carry bag. When ready to fold up the tent sit on the ground. We usually zip the tent closed at this point but have occasionally forgotten to. Place the zipper carry bag across your lap --the bag everything goes into. That tells you how wide the tent needs to be when you are rolling it up TIGHTLY, not loose, but tightly (best as you can). You keep folding in the left and right side of the tent so that the width of it stays the same as the width of the carry bag. Just practice doing that a few times if this is all new to you. It was new to all of us at one time. Once you get the hang of that, when you go to roll it up again, for the last time, to actually put it away, about half way through or close to being done rolling it up, lay the tent poles that are in their own bag, lay them inside the tent as you roll up the tent. Take those two ribbons that came with it when you first opened the tent up and tie each of those ribbons around the tent that you just rolled up, to make it a bit smaller in width. Tie one ribbon kind of near one end of the rolled up tent. Tie the other one near the other end of the tent. It makes it a little more compact. Place that into your zipper carry bag. (Side Note: You can tie those ribbons around the carry handles of the bag when taking out the tent, to make sure they don't get lost or blow away....and....we don't really use those set of six smaller sand bags but it was nice that they came with it.)
Scritto da: Pixel
Owned since 2013 and used >50x at beach
I bought this tent in 2013 and have used it exclusively at the beach >50x. Please read if you plan on using at BEACH or anywhere else and have viewed negative reviews. If you are NOT familiar with setting up a tent you should set this up PRIOR to going out to use it for the first time, this will make your setup and day much more enjoyable (even in indoor space). You should also know how to create a simple guy-line knot, easily found on web and be able to push down the tent stakes into the sand and or ground all the way down. - The tent does come with everything you need to securely setup at beach in a windy environment. I just did it again yesterday with consistent 16+ MPH winds coming off the water for 5+hrs. - In a windy day you really need two people to lay out the tent on the sand/ground and not blow away while you put in the 3x poles (2 black shorter and 1 grey longer). - The tent has color coded sleeves; this makes it easy to orient pole and insert in the right sleeves (Black and Grey). NOTE: If windy day, make sure the sandbags and tent stakes are secure in the tent bag. You will need them to be readily accessible during the tent setup and not blow away! - You can use a heavy item to secure middle of tent if you do not have another person to help. If very windy you really should have two ppl to setup the tent safely. 1. Lay out the tent with the top of tent facing up. On windy days make sure you do NOT have the open side of the tent facing the wind. Ideally you need to have a side and or back of the tent facing the wind. I also make sure the zippered window is at least 50% closed. 2. I insert the 2x black and then 1x grey poles into the sleeves. Make sure the pole sleeves are fully expanded to each side of the tent. 3. Once this is completed secure the end of one pole to one if the grommets into one side and then the other side of tent—the tent will expand (the pole sleeves MUST be extended to do this). 4. Complete this for each end of the pole. Once this is completed correctly the entire tent should be open and ready to be secured into sand/lawn. 5. I fill two sandbags completely and then open the rope guy lines on both sides into the direction of the wind (you can do this prior to inserting poles into the tent sleeves so they are ready). 6. Dig down to wetter sand and ensure the entire sandbag is covered. Secure the tent guy line to the sandbag. I use a guy-line knot to easily secure and adjust the tautness of the line as needed. Repeat this step for the other line. NOTE: You need to make sure the sandbags and guy lines are extended toward the direction of where the wind is coming from. 7. Use the tent stake to secure the tent where guy lines are extended first and all the other stakes. You may need to zipper a portion of the apron in front of the tent up towards the direction of wind to deter sand from coming into tent. - I keep the rear tent window closed on very windy days to deter sand from blowing directly into tent. - If it is not a windy day and you get sand in tent, you can easily lift empty and unsecured tent up from rear and sand will fall away from tent opening. I will edit and or add pics to this review shortly.
Scritto da: Sparkly Star
I wouldn't be without it
Absolutely fabulous beach shelter for 2 adults. Enough room for 2 low seats and total protection from the blazing sun.
Scritto da: Humberto Melosoto
Necesita 4 refuerzos
The media could not be loaded. Estoy en Tampico, hoy tenemos viento de 18 y la semana pasada de 32 kmxh. Le tuvimos que poner los refuerzos de los hilos blancos que tiene en los costados, cavamos y enterramos las estacas y luego las cubrimos de arena, así como se ve en el video. También pusimos dos costales de arena dentro de la tienda, uno en cada lado, solo así se detiene del aire. El tiempo por todo fue como 13 minutos. Te recomiendo que te compres unas palas pequeñas de jardín, yo compre unas Truper.
Scritto da: David
A must-have for a day at the beach
I simply love this shade/half-tent. I felt so good using it on the beach where there’s no shade. The tent is so deep inside it feels like having your own private room on the beach. It takes 5-10 minutes and two people to easily set up. Pros: +Great value and utility for the price. +Extended roof provides ample shade. +Wide and tall enough to fit two and a half adults. +Included ground stakes to secure the tent to the ground. +Intuitive colour-coded rod loops makes assembly easy. +Built in cord inside to hang wet clothes. +One of the only beach shades out there that has a close-able door to function as a changing room. +Rear door is a two-piece design comprised of a mesh and a solid barrier giving the options to vent through the mesh, fully close, or fully open. There are pegs on the inside to hold the door up if you need to. Cons: -Rod loops are made of mesh which can be fragile and make assembly/disassembly annoying when the rods get snagged in the mesh. Have to be careful not to rip the mesh loops. -The large size can be a bit cumbersome to assemble in the middle of a crowded beach.
Scritto da: Victor فيكتور
Práctica y portátil carpa para sombra en la playa, resistente al viento
The media could not be loaded. Es una carpa para sombra en la playa de excelente calidad, es muy fácil de armar e instalar en muy poco tiempo. Lo que más me ha gustado, es que a diferencia de otras esta es muy espaciosa y tiene buena altura, habiendo lugar hasta para tres personas sentadas y también es muy útil como vestidor cerrándose la entrada y ventana completamente. En cuanto a su resistencia al viento fuerte, logra superar la prueba, con sus bolsas de arena que se pueden sujetar fácilmente en cada uno de los extremos, y a diferencia de otros modelos, esta tiene dos cuerdas tensoras de cada lado de la carpa, que se sujetan también con bolsas de arena. Para que logre ser muy resistente al viento, las bolsas de arena deben estar enterradas completamente, las dos cuerdas sujetadas con mucha tensión, y las estacas enterradas a un ángulo de 60 grados y también cubiertas completamente con la arena. No ocupa mucha espacio, viene en una bolsa que mide 60 cms de largo por lo que es fácil de transportar. Cumple muy bien con su función de carpa para sombra en la playa, siendo que NO es una casa de campaña para el bosque u otro lugar.
Scritto da: Cesar Martinez
Excelente compra, mejor de lo que esperaba
Me encanto, es muy practica y de muy buena calidad, sirve perfectamente para cambiarse dentro de ella ya que al cerrarla no se ve nada para adentro. Cuenta con unas bolsas que se pueden llenar de arena para hacer contrapeso para que no se levante aparte de las estacas. Es fácil de armar pero yo sugiero “practicar” el armado antes para no batallar ya estando en la playa/campo. 2 personas acostadas junto con tus cosas caben perfectamente

Prodotti correlati

hot
Baldacchino istantaneo Coleman 7 x 5 piedi
3.5/5

€ 247.31

Baldacchino istantaneo Coleman 7 x 5 piedi
3.5/5

€ 247.31

Scopri il nostro network internazionale

Spediamo in 28 paesi, oltre 200.000 prodotti. Resta aggiornato, iscriviti alla newsletter.

Shopping Cart